

Dear Lord, a fish pencil case with a zipped mouth, can you even believe how adorable? I saw this idea floating around the internet and decided I had to have one, then filed the thought away, and then promptly forgot about it.
Then my son sent me some fabric from Taiwan that arrived yesterday and one of the prints reminded me of fish scales, and I said EUREKA!! I must make a fish pencil case! So I did.

I had to develop a pattern and figure things out for myself, so I'm making a tutorial (click the read more link) for anyone who needs a fish case for pencils, double pointed knitting needles, or whatever one would like to stuff in a fish who has zipped lips.
You will need a main fabric for the body, a contrast fabric for fins and lining, a zipper at least 6 inches long, buttons, and thread.
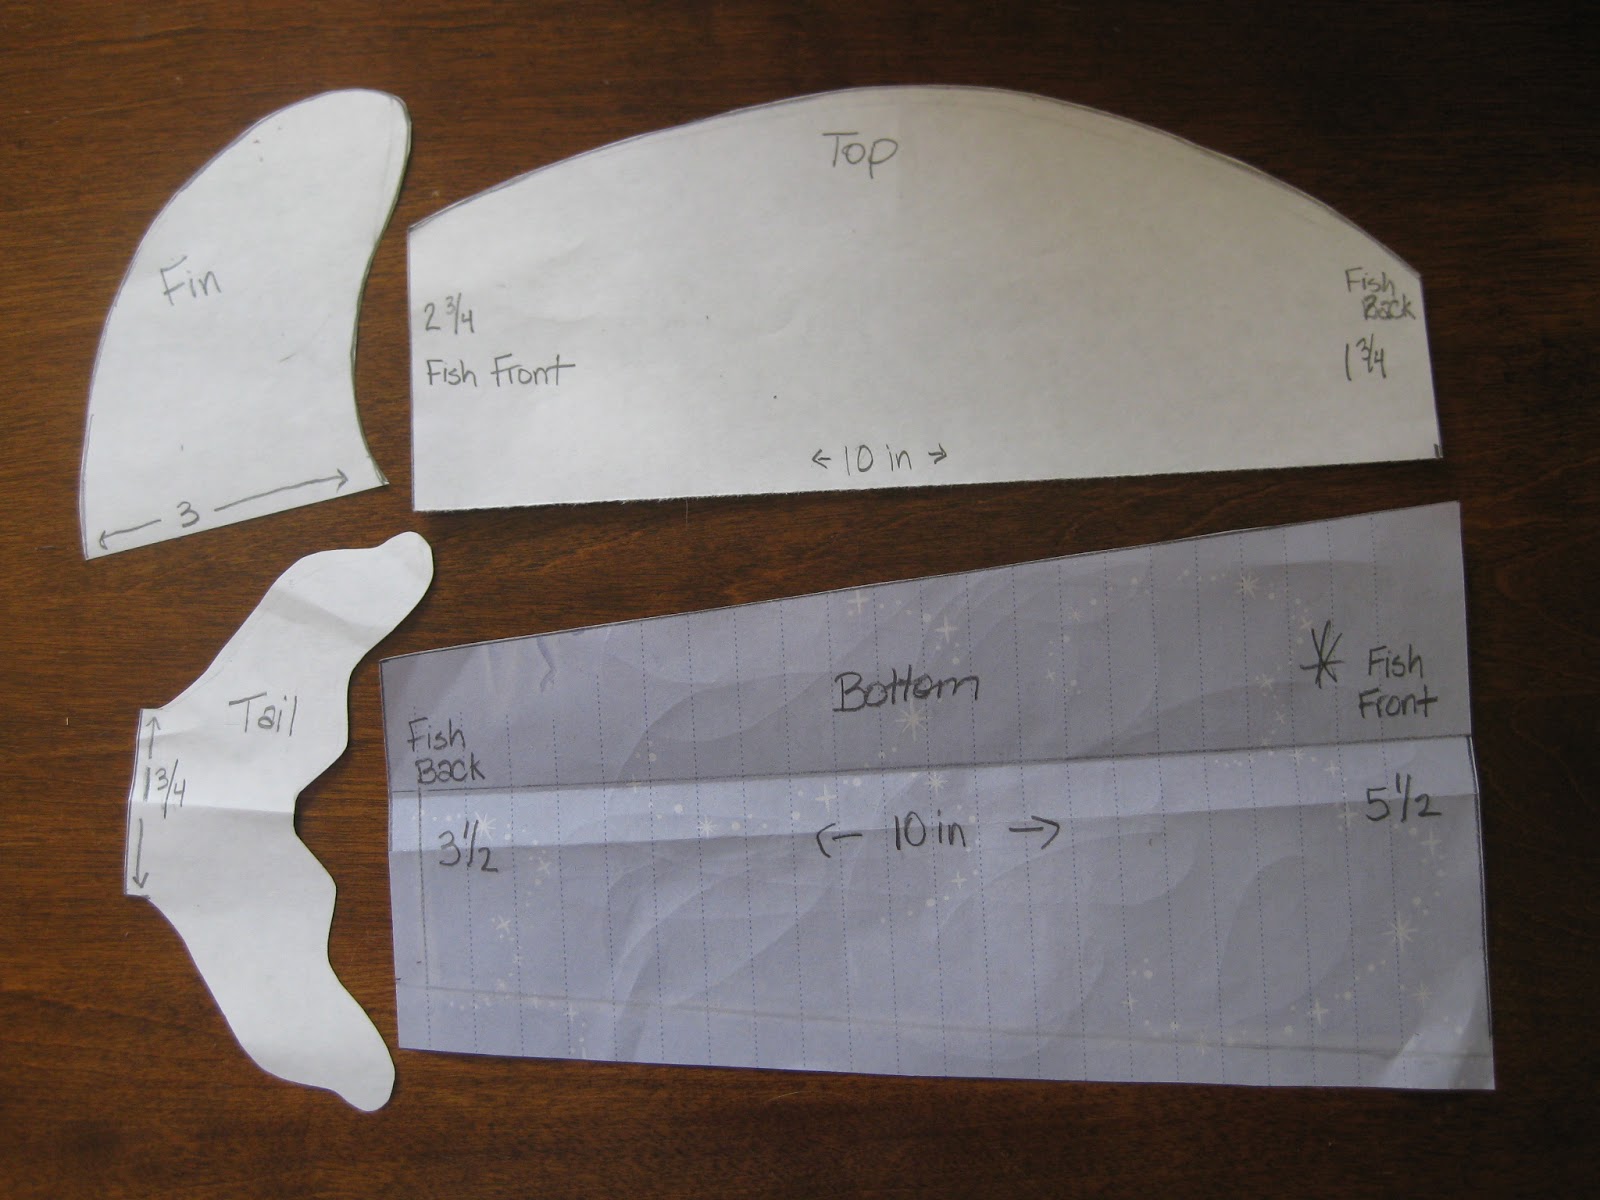
Also, note that on the piece marked Bottom, that the end which is 5 1/2 inches is the FRONT (mouth) of the fish, and the end marked 3 1/2 inches is the BACK (tail end) of the fish. Its confusing the way I laid it out and marked it, (I was too lazy to flip it over and make it more straight forward) so, sorry for that.
Cutting:
Bottom of Body Piece: Cut one of main fabric, and cut one of contrast fabric for lining.
Top of Body Piece: Cut two of main fabric, and cut two of contrast fabric for lining.
Fins: Cut 6 out of contrast fabric.
Tail: Cut 2 out of contrast fabric.


Turn right side out and press well.


Pin the top curved edge right sides together (making sure to catch the fin with a few pins) and sew a 3/8 inch seam. Again, you will see that the front (mouth) of the fish, is wider than the back (tail) end.


Using the contrast (lining) fabric body top pieces, sew the upper curved edge. Do not turn and press this piece, just leave it as is.

To install the zipper, open the zipper, then: At the mouth edge:
1: Place your lining right side facing up. On top of that:
2: Place your zipper face up (the pull tab is facing up). On top of that:
3: Place your main fabric right side facing down.

Pin your three layers together and carefully stitch a 3/8 seam through all thicknesses.


1) Place lining right side facing up.
2) Place zipper right side facing up.
3) Place main fabric right side facing down.
Stitch seam, press, and top stitch as you did for the other side.

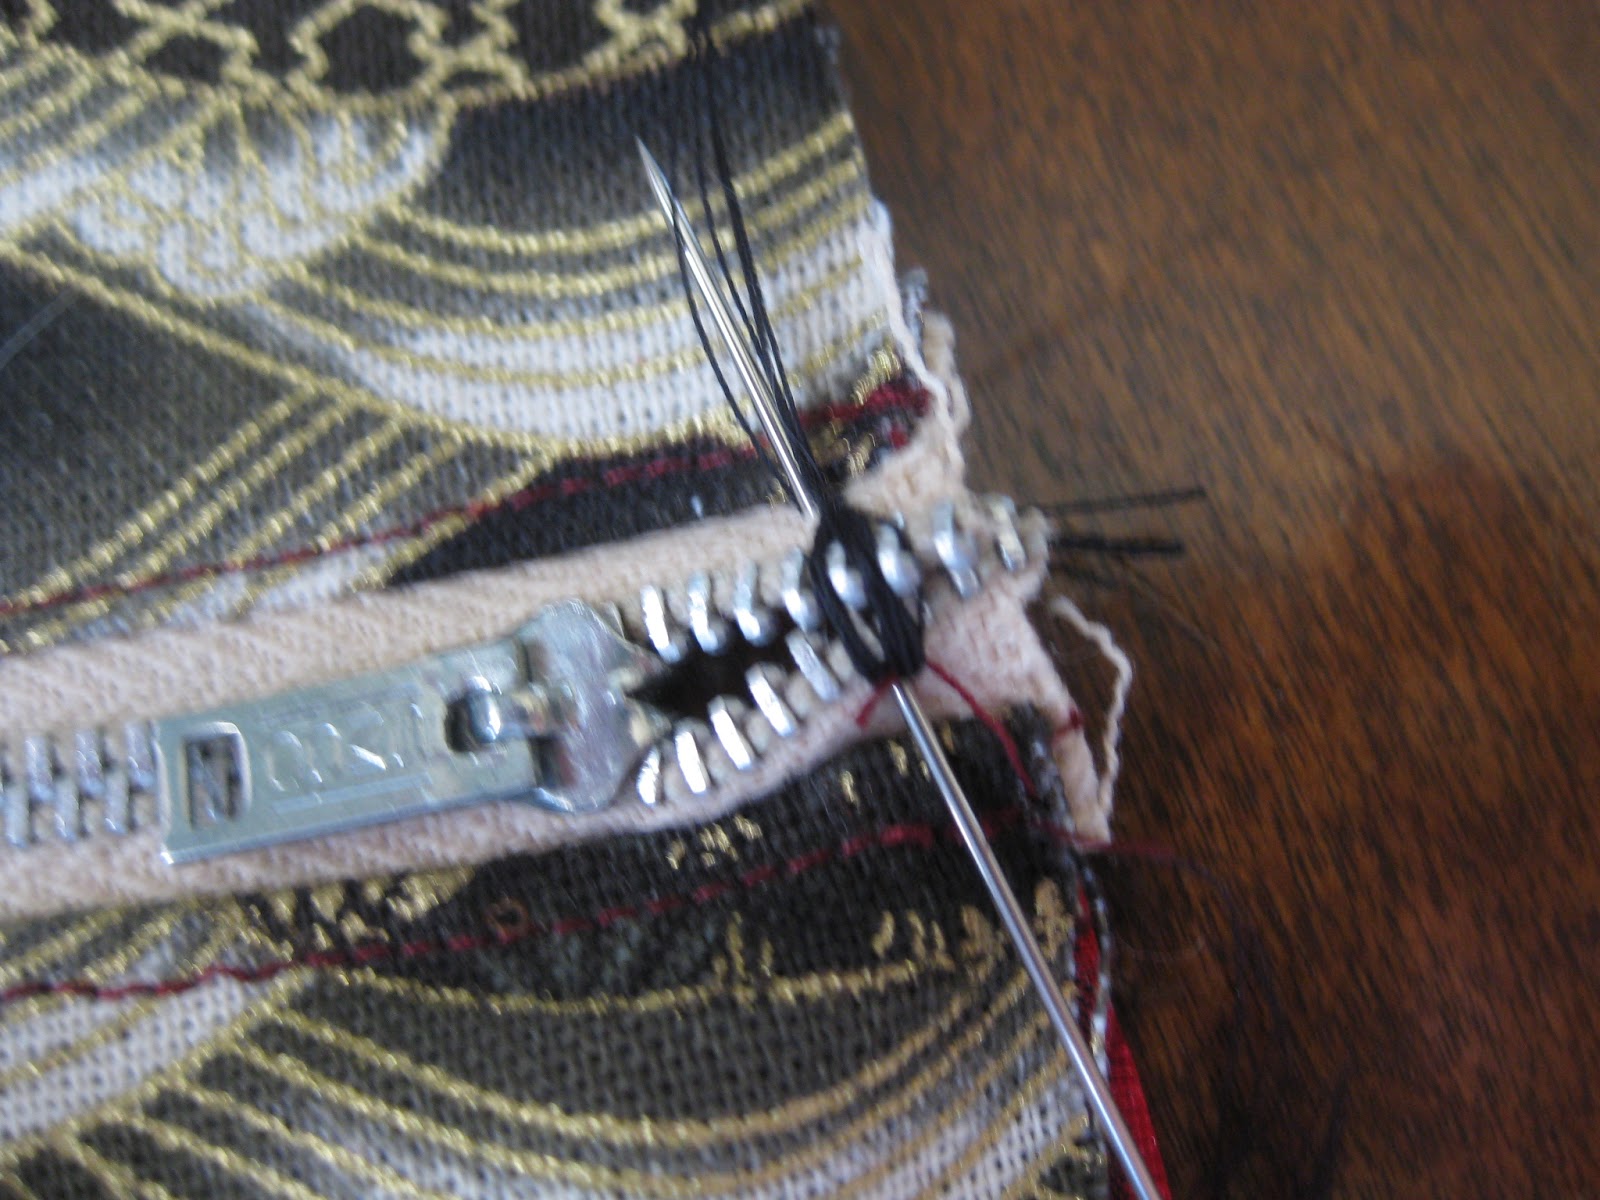


At this point, make sure your zipper is fully opened or you will curse after then next step.

With right sides together, pin the top piece and the bottom piece of the lining together, and stitch.


Add buttons for eyes. I stacked a large white button, a smaller black one on top, and an even smaller black one on top of that, then sewed them on.
An end note: Since this is a prototype and I made this up as I went along, I would like to say that if I were to make another, I would make the tail end narrower. The width for the tail end (back) on the bottom of the body measures 3 1/2 inches, and I would reduce that by an inch. You would also have to modify the top tail end to reflect that change.
However!
Fish!

Who keeps his lip zipped!!
An end note to the end note:
That tail situation was bothering me so I decided to pleat and tack it to make it a bit narrower, like so:

I take back my statement of making the next one with a narrower tail. I love how the pleats made the tail all flowy and I much prefer it to the look of the flat tail.

See him all flowy tailed and zip lipped? So flowy! So zip lipped!
Shared at:
The Shady Porch
Someday Crafts
And a bunch of other places.
that is COMPLETELY adorable! love it!
ReplyDeleteThis is very neat! Congratulations.
ReplyDeleteHow cute! Your son really did send a perfect fabric! Great tutorial. This would make a fun teacher gift! Thank you for sharing it at the Shady Porch! Blessings, D
ReplyDeleteWhat a fun pencil case!!! And your son has given you the perfect fabric to make it with.
ReplyDeleteMy sincere thanks to all of you for your kind words, I really appreciate it!
DeleteI like it!my son too
ReplyDeleteWhat a great pouch....thanks so much for sharing!
ReplyDeleteThat is so cute!
ReplyDeleteTotally cute.Thanks for the tutorial and the pattern
ReplyDeleteTotally cute.Thanks for the tutorial and pattern
ReplyDeleteHi Linda, I've featured your fish pencil case today... Threading Your Way Features
ReplyDeleteWonderful! What do you think about stuffing a little fiberfill in the fin and tail (or maybe just the fins)or adding some batting and quilting, or simply adding some interfacing?
ReplyDeleteWonderful! What do you think about adding some fiberfill to the fins and tail (or maybe just the fins) or adding some batting and quilting, or using interfacing?
ReplyDeleteIt's wonderful!! I linked it also in my fan page!!
ReplyDeleteThis is darling! Off to pin :)
ReplyDeleteCan I pay you to make me one? My son LOVES catfish. If interested let me know at memurley@gmail.com. Thank you, Michele
ReplyDeleteThank you for sharing this cute guy! I love it!
ReplyDeleteI used your advice to make one with my own pattern. I turned out really well! I've never done a zipper before and I never could have figured out the zipper and lining without your help, thanks!
ReplyDeleteThanks a lot for this wonderfull pattern !! Have a good day !!
ReplyDeleteTo Linda of lindapendantedreams blog:
ReplyDeleteI’m writing to you because your pattern for a fish shaped pouch is essentially a copy of my own shark pencil case design, which is protected under copyright, and was first published in January of 2011.
I ask you to remove your entire blog post for the “Zip Lipped Fish Pouch with Tutorial”. In the future, please refrain from this or any other infringement of my copyright.
I thank you in advance for removing your post and discontinuing from selling or posting any more shark/fish shaped cases or patterns derived from my design.
Sincerely,
Mary Pow
MinneBites
www.minnebites.etsy.com
www.minnebites.com