I finally refinished the last of this set of four chairs and thought I'd make a tutorial on how to make custom seat cushions. Photos and instructions are after the break.
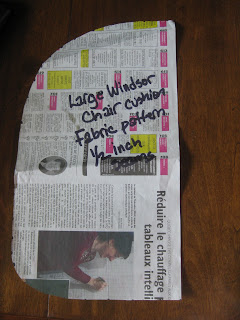
Draw out a pattern on paper using the seat of your chair as a guide, and add 1/2 inch all around for a seam allowance. I drew out half the pattern here, and cut my fabric on a fold.
Place your pattern on a fold of your fabric, and cut out two pieces.
If you are going to transfer an image onto your fabric, you can find a tutorial on how to do that here
Cut out a piece of quilt batting 1/2 inch smaller than the pattern. Tip! As an aside, I was ready to throw out an old shabby comforter one day, and then it dawned on me that there was free quilt batting inside. Hello recycle, reduce, reuse, we are friends! I cut off the fabric whenever I need to use the batting, and that is what I used on my seat cushions.
For the ties, cut out two strips of fabric, three inches wide by 36 inches long. Fold in half width wise, and sew a seam 1/2 inch from raw edge, leaving the ends open.There are many ways to sew the ties, this is how I did mine. Using super strong thread and a very long needle, I stitched a few times on the raw edge of one end.
Slide the needle into the 'tube' blunt end first.
Pull the needle along. You'll have to fiddle with the tacked opened end to get the fabric to begin turning right side out.
Continue pulling the needle along until the ties are completely turned right side out.
Press the ties.
Place the right side of one of your cushion pieces onto the seat, determine where you'd like the ties to be sewn in, fold in half, and pin them down as shown, note that they're folded into a V shape.
Pin the inner V 1/2 inch from the raw edge, with the long ends facing inward.
Pin front and back pieces with right sides together, being careful not to catch the ties into the seam allowances. The line I have marked in black is to remain open when you are sewing the front to back.
Sew front and back together, leaving a good four inch opening as indicated above, and when you come to the ties, reinforce those seams by stitching over them a few times. Again, make sure you don't catch the ties into your seam in any area other than the top.
Clip all curves. Turn the seat cover right side out.
Give it a really good press.
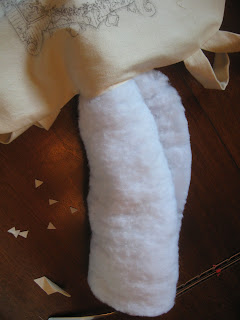
Roll up your batting and wiggle it into the cover.
Stuff your hand in there and unroll the batting and smoosh it around until it's laying flat everywhere.
Topstitch all around, catching the batting into your seam - this will stop the batting from shifting during wash. I'll come clean here and say that I did not catch the batting into my seam, because I wash these by hand. I need to soak them for a really long time in OXICLEAN because, well, you can imagine why. Five cats have commandeered them, plus human sloppage = must be soaked a really long time. Since I wash them by hand, and prefer to lay them flat to dry, the batting doesn't shift.
Here's a before shot of the chair:


Nice before, but great in black and with those custom covers!
ReplyDelete-Revi
The cushion covers look great with the print. Thanks for sharing such a comprehensive tutorial.
ReplyDelete